Stroke Contrasts Revisited
It is very hard to be aware of the flaws in your own stroke technique because they tend to occur in parts of your stroke where you have holes in your proprioception or body awareness. Way back in December 2009 we posted a classic blog to help you self-diagnose such flaws using something called 'stroke contrasts'. This is a very useful method for those without a coach overseeing their swimming and well worth a revisit today, two and a half years on!
The idea is very simple: swim a short distance and deliberately add a flaw to your stroke. If the flaw makes your swimming feel immediately worse that's fine but if it feels the same or only a little different from normal then there's a good chance we've identified an area for improvement in your swimming.
Our suggested procedure: Deliberately introduce the stroke flaw for 100m and see how it feels. Rest for 15 seconds and then immediately swim 100m removing the flaw and emphasising good technique in that area. Feel the contrast!
We've given you some suggestions below of common stroke flaws that you can experiment with. Also refer back to our 2009 blog post here for more examples and feel free to invent your own too!
Contrast 1: Putting On The Brakes
Contrast 2: Pushing Downwards During The Catch
Contrast 3: Thumb First Hand Entry
Contrast 4: Lifting Your Head To Breathe
Contrast 5: Holding Your Breath Underwater
Contrast 6: Tapping Your Big Toes Together
Putting It Together
Using the stroke contrasts above, you can construct a valuable stroke technique session:
Swim Smooth!
The idea is very simple: swim a short distance and deliberately add a flaw to your stroke. If the flaw makes your swimming feel immediately worse that's fine but if it feels the same or only a little different from normal then there's a good chance we've identified an area for improvement in your swimming.
Our suggested procedure: Deliberately introduce the stroke flaw for 100m and see how it feels. Rest for 15 seconds and then immediately swim 100m removing the flaw and emphasising good technique in that area. Feel the contrast!
We've given you some suggestions below of common stroke flaws that you can experiment with. Also refer back to our 2009 blog post here for more examples and feel free to invent your own too!
Contrast 1: Putting On The Brakes
 | A classic problem encountered by those trying to overly lengthen the freestyle stroke is dropping the wrist and showing the palm forwards in front of the head. Try 50m braking with the right hand and then 50m braking with the left hand. To correct, focus on keeping the hand a little lower in the water and angling the hand slightly downwards so the fingertips are a touch lower than the wrist. Get this right and you should feel a noticeable improvement in your stroke rhythm. Recommended SS product: Catch Masterclass DVD or Overglider Swim Type Guide Recommended tool to help correct flaw: Finis Agility Paddle |
Contrast 2: Pushing Downwards During The Catch
| One of the root causes of a poor body position in the water is pressing down in front of the head during the catch. This lifts the front end of the swimmer up and sinks the legs. This action creates a lot of pressure on the palm of the hand which can be misinterpreted as a good catch but pressing downwards doesn't help engage the water or create any propulsion. Contrast this with bending the elbow in front of the head to press the water backwards, this will feel less forceful but it is generating much more propulsion! Recommended drill: Doggy Paddle Recommended SS product to correct flaw: Catch Masterclass DVD |
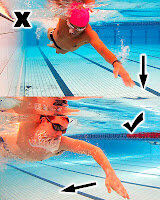
Contrast 3: Thumb First Hand Entry

| The leading cause of shoulder pain and injury is a thumb first entry into the water, with the palm facing outwards. This internally rotates the shoulder, creating a twisting action and possible impingement. Repeated thousands of times in training this leads to inflammation in the shoulder and ultimately injury.
Contrast this with the correct hand entry, with the hand facing downwards, entering fingertips first. If you feel any shoulder pain trying this exercise, stop immediately!
Recommended tool: Finis Agility Paddles
(these give you feedback by becoming unstable with a thumb first entry) |
Contrast 4: Lifting Your Head To Breathe

| Deliberately lift your head upwards so that your head clears the surface when breathing. This is poor technique as it acts to sink your legs downwards and involves pressing downwards with the lead hand which harms your catch. Straining upwards in this manner can also be the cause of neck pain. Contrast this with keeping your head low in the water breathing into the bow wave trough. More information on bow-wave breathing: www.swimsmooth.com/breathing.html Recommended Visualisation: The Split Screen View |
Contrast 5: Holding Your Breath Underwater

| This one was in our original blog post but it's so important it bears repeating! Swim 100m holding your breath underwater, exhaling at the very last moment before breathing in. Contrast this with a smooth relaxed exhalation as if you are sighing into the water. Focus on relaxing and letting go of the water easily. If possible, breath every three strokes or less frequently to give yourself time to exhale fully. Getting rid of the CO2 in your lungs and blood stream by exhaling smoothly helps you feel more relaxed and aerobic when swimming. A good exhalation technique is key to allowing you to breathe bilaterally. Recommended drill: Sink Down Exercise |
Contrast 6: Tapping Your Big Toes Together
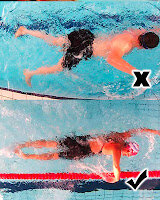
| Tapping your big toes as they pass is good stroke technique and helps you identify a scissor kick in your stroke. Swim 100m with a gentle flutter kick, turning your feet in slightly (pigeon toed) and brushing your big toes lightly together as they pass. You should feel a regular tap-tap-tap-tap. If there's any pauses or irregularity to the tapping then it's likely your legs are parting significantly. Be especially aware of any pauses during and immediately following breathing - this is when scissor kicks normally occur and they are easily missed whilst you are focused on breathing. Correction: Most scissor kicks are caused by the lead arm crossing the centre line in front of the head. This causes you to lose balance and unconciously scissor kick to regain stability. Both our Arnie Swim Type Guide and our Catch Masterclass DVD are perfect for improving your stroke alignment. |
Putting It Together
Using the stroke contrasts above, you can construct a valuable stroke technique session:
| 300m easy warmup, focus on good stroke rhythm |
| Perform the six stroke contrasts above in turn as:
100m introducing stroke flaw + 15 seconds rest + 100m focusing on good technique in that area
|
| 200m easy warmdown, focusing on correcting the biggest flaw you diagnosed in your stroke. Only think about a single aspect, don't try and focus on several things at once! |
Swim Smooth!